Contents
1. Introduction to unit testing
1.1. Unit testing
A unit test build code for goal to use code test
code. Unit test ensure that code is working normal after code changed.
1.2. Unit testing with JUnit
Junit 4.x a test framework. It’s used annotation
to identify methods.
To write a test with JUnit
·
Annotate a method with
@org.junit.Test
·
Use a method provided by
JUnit to check the expected result of the code execution versus the actual
result
You can use Eclipse or the org.junit.runner.JUnitCore class to run the test.
2. Installation of JUnit
If you use Eclipse you can use the integrated
JUnit in Eclipse for your testing.
You download Junit4.x.jar in here: http://www.junit.org/
3. Exercise:Using Junit
3.1 Project preparation
Create new project NewTest. Create a new source
folder test via right-click on your project, select “Properties” and choose the
“Java Build Path”. Select the “source” tab.


3.2 Create a Java class
In the source folder, create the package
Class1 and following class:
package Class1;
public class ClassDemo {
public int addition(int x, int y){
return x+y;
}
|
3.3 Create a Junit test
Right click on your new class in the package and
select New->Junit test cases. Select
“New Junit 4 test” and set the source folder to test.
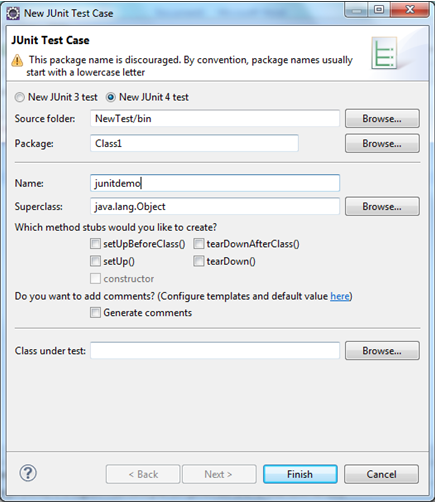
If the
Junit library is not part of your classpath, Eclipse will prompt to do.

Create a test with the following
code such as:
package Class1;
import static org.junit.Assert.*;
import
junit.framework.TestCase;
import org.junit.After;
import org.junit.Before;
import org.junit.Test;
import Class1.ClassDemo;
public class junitdemo extends TestCase {
@Before
public void setUp() throws Exception {
}
@Test
public void test() {
ClassDemo addition = new ClassDemo();
assertEquals("Result",
addition.addition(10, 5));
}
@After
public void tearDown() throws Exception {
}
|
3.4 Run your test via Eclipse
Right click on your new
test class and Select Run As->Junit Test


You see Failures, Fixed
it to use function:
assertEquals("Result",
15, addition.addition(10, 5));


If you have
several tests. You can combine them into test suite. Running a test suite willl
execute all tests in that suite.
To create a
test suite, select your test classess->right click on
it->New->Other->Junit->Test Suite


Select the
Next button and select the methods for which you want to create a test
package Class1;
import org.junit.runner.RunWith;
import org.junit.runners.Suite;
import org.junit.runners.Suite.SuiteClasses;
@RunWith(Suite.class)
@SuiteClasses({ junitdemo.class })
public class AllTests {
//code in here
}
|
import
junit.framework.TestSuite;
import
org.junit.runner.RunWith;
import
org.junit.runners.Suite;
@RunWith(Suite.class)
@SuiteClasses({ junitdemo.class })
public class AllTests extends TestSuite{
public static TestSuite suite(){
TestSuite suite = new TestSuite();
suite.addTestSuite(junitdemo.class);
return suite;
}
}
|
3.5 Run your test via code
You can also
run your tests from via your own code. The org.Junit.runner.JunitCore class
provides the runClasses() method which allows you to run one or serveral tests
classes. As a return parameter you receive an project of the type
org.junit.runner.Result. This object can be used to retreive information about
the tests.
import
org.junit.internal.TextListener;
import
org.junit.runner.JUnitCore;
import org.junit.runner.RunWith;
import
org.junit.runners.Suite;
import
org.junit.runners.Suite.SuiteClasses;
@RunWith(Suite.class)
@SuiteClasses({ AllTests.class, junitdemo.class })
public class TestSuite {
public static void main(String[]arg){
JUnitCore core = new JUnitCore();
core.addListener(new
TextListener(System.out));
core.run(junitdemo.class);
}
}
|
3.6 Advantage/disadvantage to use Testsuite and JunitCore
Testsuite
|
JunitCore
|
|
Pros
|
The suite is still a JUnit test.
You get one set of output
|
Cleaner and not subject to a side
effect
|
Cons
|
You are relying on JUnit
continuing to run the tests in the same order as specified in the test suite.
It is documented that the order isn't guaranteed so you would be introducing
code that relies on a side effect.
It isn't apparent which test has failed. (You can mitigate this by having DummyTestToSetProperty output what the current property is.) |
Runs multiple suites with separate
output. Could be a problem for your build tool
|
4 Detail Junit
4.1 Annotations
Annotation
|
Descriptions
|
@Test public void method()
|
The annotation @Test identifies
that a method is a test method.
|
@Before public void method()
|
Will execute the method before
each test. This method can prepare the test environment (e.g. read input
data, initialize the class).
|
@After public void method()
|
Will execute the method after each
test. This method can cleanup the test environment (e.g. delete temporary
data, restore defaults).
|
@BeforeClass public void method()
|
Will execute the method once,
before the start of all tests. This can be used to perform time intensive
activities, for example to connect to a database. Methods annotated with this
annotation need a static modifier to work with JUnit.
|
@AfterClass public void method()
|
Will execute the method once,
after all tests have finished. This can be used to perform clean-up
activities, for example to disconnect from a database. Methods annotated with
@AfterClass need a static modifier to work with JUnit.
|
@Ignore
|
Will ignore the test method. This
is useful when the underlying code has been changed and the test case has not
yet been adapted. Or if the execution time of this test is too long to be
included.
|
@Test (expected = Exception.class)
|
Fails, if the method does not
throw the named exception.
|
@Test(timeout=100)
|
Fails, if the method takes longer
than 100 milliseconds.
|
4.2 Assert
Assert
|
Descriptions
|
fail(String)
|
Let the method fail. Might be used
to check that a certain part of the code is not reached. Or to have failing
test before the test code is implemented.
|
assertTrue(true) /
assertTrue(false)
|
Will always be true / false. Can
be used to predefine a test result, if the test is not yet implemented.
|
assertTrue([message], boolean
condition)
|
Checks that the boolean condition
is true.
|
assertsEquals([String message],
expected, actual)
|
Tests that two values are the
same. Note: for arrays the reference is checked not the content of the
arrays.
|
assertsEquals([String message],
expected, actual, tolerance)
|
Test that float or double values
match. The tolerance is the number of decimals which must be the same.
|
assertNull([message], object)
|
Checks that the object is null.
|
assertNotNull([message], object)
|
Checks that the object is not
null.
|
assertSame([String], expected,
actual)
|
Checks that both variables refer
to the same object.
|
assertNotSame([String], expected,
actual)
|
Checks that both variables refer
to different objects.
|
No comments:
Post a Comment