Friday, December 7, 2012

Junit Tutorial


Contents


1. Introduction to unit testing


1.1. Unit testing

A unit test build code for goal to use code test code. Unit test ensure that code is working normal after code changed.

1.2. Unit testing with JUnit

Junit 4.x a test framework. It’s used annotation to identify methods.
To write a test with JUnit
·      Annotate a method with @org.junit.Test
·      Use a method provided by JUnit to check the expected result of the code execution versus the actual result
You can use Eclipse or the org.junit.runner.JUnitCore class to run the test.

2. Installation of JUnit

If you use Eclipse you can use the integrated JUnit in Eclipse for your testing.
You download Junit4.x.jar in here: http://www.junit.org/

3. Exercise:Using Junit

3.1 Project preparation

Create new project NewTest. Create a new source folder test via right-click on your project, select “Properties” and choose the “Java Build Path”. Select the “source” tab.


Press [Add folder] button, afterwards press the Create [New folder] button. Create the test folder.


3.2 Create a Java class

In the source folder, create the package Class1 and following class:
package Class1;

public class ClassDemo {
       public int addition(int x, int y){
                     return x+y;
}


3.3 Create a Junit test

Right click on your new class in the package and select New->Junit test cases. Select
“New Junit 4 test” and set the source folder to test.
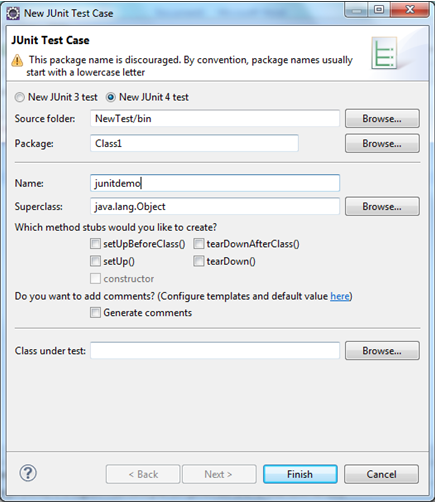


If the Junit library is not part of your classpath, Eclipse will prompt to do.


Create a test with the following code such as:

package Class1;

import static org.junit.Assert.*;
import junit.framework.TestCase;
import org.junit.After;
import org.junit.Before;
import org.junit.Test;
import Class1.ClassDemo;


public class junitdemo extends TestCase {
      
       @Before
       public void setUp() throws Exception {
       }

      
       @Test
       public void test() {
              ClassDemo addition = new ClassDemo();
              assertEquals("Result", addition.addition(10, 5));
       }
      
       @After
       public void tearDown() throws Exception {
       }

3.4 Run your test via Eclipse

Right click on your new test class and Select Run As->Junit Test


The result of test by Junit such as:


You see Failures, Fixed it to use function:

assertEquals("Result", 15, addition.addition(10, 5));


If you have several tests. You can combine them into test suite. Running a test suite willl execute all tests in that suite.
To create a test suite, select your test classess->right click on it->New->Other->Junit->Test Suite


Select the Next button and select the methods for which you want to create a test
package Class1;

import org.junit.runner.RunWith;
import org.junit.runners.Suite;
import org.junit.runners.Suite.SuiteClasses;

@RunWith(Suite.class)
@SuiteClasses({ junitdemo.class })
public class AllTests {
//code in here
}

import junit.framework.TestSuite;
import org.junit.runner.RunWith;
import org.junit.runners.Suite;

@RunWith(Suite.class)
@SuiteClasses({ junitdemo.class })
public class AllTests extends TestSuite{
       public static TestSuite suite(){
              TestSuite suite = new TestSuite();
              suite.addTestSuite(junitdemo.class);
              return suite;
             
       }
}


3.5 Run your test via code

You can also run your tests from via your own code. The org.Junit.runner.JunitCore class provides the runClasses() method which allows you to run one or serveral tests classes. As a return parameter you receive an project of the type org.junit.runner.Result. This object can be used to retreive information about the tests.
import org.junit.internal.TextListener;
import org.junit.runner.JUnitCore;
import org.junit.runner.RunWith;
import org.junit.runners.Suite;
import org.junit.runners.Suite.SuiteClasses;

@RunWith(Suite.class)
@SuiteClasses({ AllTests.class, junitdemo.class })
public class TestSuite {
       public static void main(String[]arg){
              JUnitCore core = new JUnitCore();
              core.addListener(new TextListener(System.out));
              core.run(junitdemo.class);
       }
}

3.6 Advantage/disadvantage to use Testsuite and JunitCore


Testsuite
JunitCore
Pros
 The suite is still a JUnit test.
 You get one set of output 
Cleaner and not subject to a side effect 
Cons
You are relying on JUnit continuing to run the tests in the same order as specified in the test suite. It is documented that the order isn't guaranteed so you would be introducing code that relies on a side effect. 

It isn't apparent which test has failed. (You can mitigate this by having DummyTestToSetProperty output what the current property is.) 
Runs multiple suites with separate output. Could be a problem for your build tool 


4 Detail Junit

4.1 Annotations

Annotation
Descriptions
@Test public void method()
The annotation @Test identifies that a method is a test method.
@Before public void method()
Will execute the method before each test. This method can prepare the test environment (e.g. read input data, initialize the class).
@After public void method()
Will execute the method after each test. This method can cleanup the test environment (e.g. delete temporary data, restore defaults).
@BeforeClass public void method()
Will execute the method once, before the start of all tests. This can be used to perform time intensive activities, for example to connect to a database. Methods annotated with this annotation need a static modifier to work with JUnit.
@AfterClass public void method()
Will execute the method once, after all tests have finished. This can be used to perform clean-up activities, for example to disconnect from a database. Methods annotated with @AfterClass need a static modifier to work with JUnit.
@Ignore
Will ignore the test method. This is useful when the underlying code has been changed and the test case has not yet been adapted. Or if the execution time of this test is too long to be included.
@Test (expected = Exception.class)
Fails, if the method does not throw the named exception.
@Test(timeout=100)
Fails, if the method takes longer than 100 milliseconds.

4.2 Assert

Assert
Descriptions
fail(String)
Let the method fail. Might be used to check that a certain part of the code is not reached. Or to have failing test before the test code is implemented.
assertTrue(true) / assertTrue(false)
Will always be true / false. Can be used to predefine a test result, if the test is not yet implemented.
assertTrue([message], boolean condition)
Checks that the boolean condition is true.
assertsEquals([String message], expected, actual)
Tests that two values are the same. Note: for arrays the reference is checked not the content of the arrays.
assertsEquals([String message], expected, actual, tolerance)
Test that float or double values match. The tolerance is the number of decimals which must be the same.
assertNull([message], object)
Checks that the object is null.
assertNotNull([message], object)
Checks that the object is not null.
assertSame([String], expected, actual)
Checks that both variables refer to the same object.
assertNotSame([String], expected, actual)
Checks that both variables refer to different objects.

Wednesday, December 5, 2012

Comebine Selenium 2.0 + TestNG + Junit


CLASS for Selenium 2.0 such as:
//Build class data
Public class data {
       public static final WebDriver oWebDriver = new FirefoxDriver();
       public  static final String urllogin = "https://accounts.google.com/ServiceLogin?hl=vi&continue=https://www.google.com.vn/";
      
       public static final String idemail1 ="";
       public static final String  txtemail = "";
       public static  final String idpass1 = "";
       public static final String txtpass = "";
       public static final String btnlogin = "";
}

//build function
public class Login {
      
       public void login(WebDriver driver){
              driver = data.oWebDriver;
              driver.get(Data.data.urllogin);
             
             
                           // Enter Email
                           WebElement email = driver.findElement(By.xpath(Data.data.idemail1));
                           email.sendKeys(Data.data.txtemail);
                           //Enter password
                           WebElement pass = driver.findElement(By.xpath(Data.data.idpass1));
                           pass.sendKeys(Data.data.txtpass);
                           //Click Login
                           WebElement btnlogin = driver.findElement(By.xpath(Data.data.btnlogin));
                           btnlogin.click();
             
                     }
}

//Call function to use Junit
public class loadgoogle extends TestCase{
      
       public WebDriver driver;
      
       private int TIMEOUT_THREE_HOURS;

       @BeforeTest(alwaysRun=true)
       public void setUp() throws Exception {
              Logger Log;
              Log = Logger.getLogger(gogole.class);
             
       PropertyConfigurator.configure("log4j.properties");
              driver = data.oWebDriver;
              driver.get(Data.data.urllogin);  
       }

       @Test(groups="gogole")
       public void testcase() throws Exception{
              Login in = new Login();
              in.login(data.oWebDriver);
              driver.manage().timeouts().implicitlyWait(5, TimeUnit.SECONDS);
              Logout out = new Logout();
              out.logout(data.oWebDriver);
              in.screenshotJunit();
       }
      
       @AfterTest(alwaysRun=true)
       public void tearDown() throws Exception {
              //driver.close();
                System.out.println("closing the FF");
                                             try {
                                                     driver.quit();
                                             }catch(Exception e) {
                                                     System.out.println("Driver quit failed with error" + e);
                                             }
       }


}

//Build testng.xml such as:
<?xml version="1.0" encoding="UTF-8"?>
<!DOCTYPE suite SYSTEM "http://testng.org/testng-1.0.dtd">
<suite name="Suite">
       <listeners>
              <listener class-name="com.utility.Screenshot"></listener>
       </listeners>

<test name="loadgoogle" preserve-order="true">
              <groups>
                  <run>
                     <include name="gogole"/>
                  </run>
              </groups>
      
<test>
              <classes>
           <class name="Selenium Testcase.loadgoogle">
               <methods>
                   <include name="testcase"></include>
                      <exclude name="testcaselogout"></exclude>
               </methods>
           </class>
       </classes>
      
</test>>     
</suite>

Tuesday, December 4, 2012

Take a screenshot with Selenium WebDriver for Selenium


Take a screenshot with Selenium WebDriver for Selenium:

--------------------------------------------------------------------------

import java.io.File;
import java.io.IOException;
import org.apache.commons.io.FileUtils;
import org.openqa.selenium.OutputType;
import org.openqa.selenium.TakesScreenshot;
import org.openqa.selenium.WebDriver;

public class Screenshot{


public void screenshot(WebDriver webdriver, String filename) throws IOException{

//Taking the Screenshot

File screenshot = ((TakesScreenshot) webdriver).getScreenshotAs(OutputType.FILE);
//Saving the image
  try {
                 FileUtils.copyFile(screenshot, new File(filename));
             } catch (IOException e) {
                 e.printStackTrace();
             }           

}
--------------------------------------------------------------------------
public static void main(String[] args) throws IOException {
 Screenshot  s = new Screenshot();
 String file1 = "d://Screenshot//screenshot.png";
 s.screenshot(data.oWebDriver, file1);

 }
}

By HoaLe

Monday, December 3, 2012

Testing Strategies


Testing Strategies
Strategy is a general approach rather than a method of devising particular systems for component tests.
Different strategies may be adopted depending on the type of system to be tested and the development process used. The testing strategies are

Top-Down Testing
Bottom - Up Testing
Thread Testing
Stress Testing
Back- to Back Testing
1. Top-down testing
Where testing starts with the most abstract component and works downwards.

2. Bottom-up testing
Where testing starts with the fundamental components and works upwards.

3. Thread testing
Which is used for systems with multiple processes where the processing of a transaction threads its way through these processes.

4. Stress testing
Which relies on stressing the system by going beyond its specified limits and hence testing how well the system can cope with over-load situations.

5. Back-to-back testing
Which is used when versions of a system are available. The systems are tested together and their outputs are compared.

 6. Performance testing.
This is used to test the run-time performance of software.

7. Security testing.
This attempts to verify that protection mechanisms built into system will protect it from improper penetration.

8. Recovery testing.
This forces software to fail in a variety ways and verifies that recovery is properly performed.


Large systems are usually tested using a mixture of these strategies rather than any single approach. Different strategies may be needed for different parts of the system and at different stages in the testing process.

Whatever testing strategy is adopted, it is always sensible to adopt an incremental approach to sub-system and system testing. Rather than integrate all components into a system and then start testing, the system should be tested incrementally. Each increment should be tested before the next increment is added to the system. This process should continue until all modules have been incorporated into the system.

When a module is introduced at some stage in this process, tests, which were previously unsuccessful, may now, detect defects. These defects are probably due to interactions with the new module. The source of the problem is localized to some extent, thus simplifying defect location and repai


Debugging
Brute force, backtracking, cause elimination. 
Unit Testing
Coding
Focuses on each module and whether it works properly. Makes heavy use of white box testing
Integration Testing
Design
Centered on making sure that each module works with another module.
Comprised of two kinds:
Top-down and
Bottom-up integration.
Or focuses on the design and construction of the software architecture.
Makes heavy use of Black Box testing.(Either answer is acceptable)
Validation Testing
Analysis
Ensuring conformity with requirements
Systems Testing
Systems Engineering
Making sure that the software product works with the external environment, e.g., computer system, other software products.
Driver and Stubs

Driver: dummy main program
Stub: dummy sub-program
This is because the modules are not yet stand-alone programs therefore drive and or stubs have to be developed to test each unit.

Some different types of tests, and their level:
·         Unit Tests to test individual classes or objects (default)
·         Acceptance tests / Functional tests (everything)
·         Performance Tests: how fast it is (extensive)
·         Load Tests: how it performs under a large load (extensive)
·         Smoke Tests: fast tests for the key functionality (mandatory)
·         Integration Tests: how the pieces work together (default)
·         Mock Client Tests: tests from the client's point of view (default)